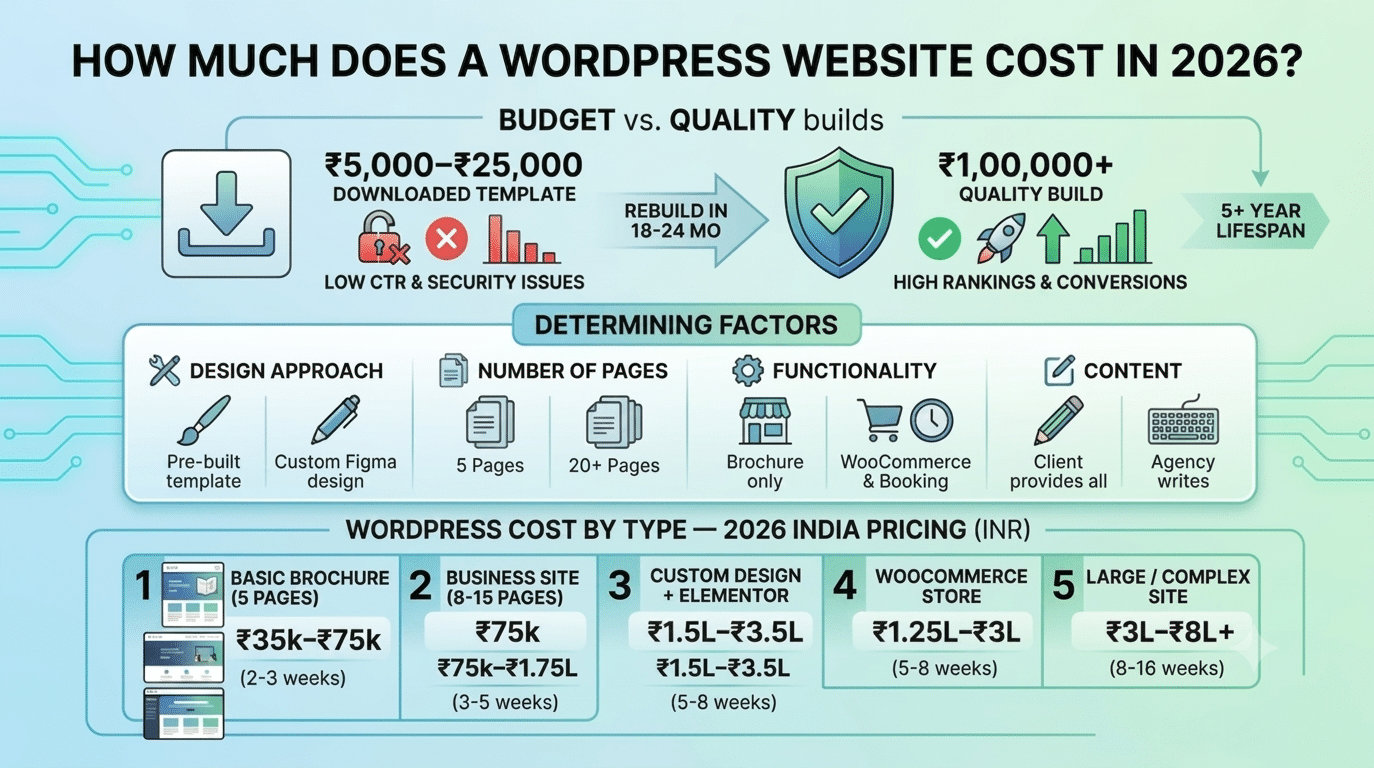
A slow WordPress website costs you money. Google’s data shows that every one-second delay in page load time reduces conversions by up to 7%. If your site takes 5 seconds to load on mobile, you’ve already lost most of your visitors before they’ve read a single word.
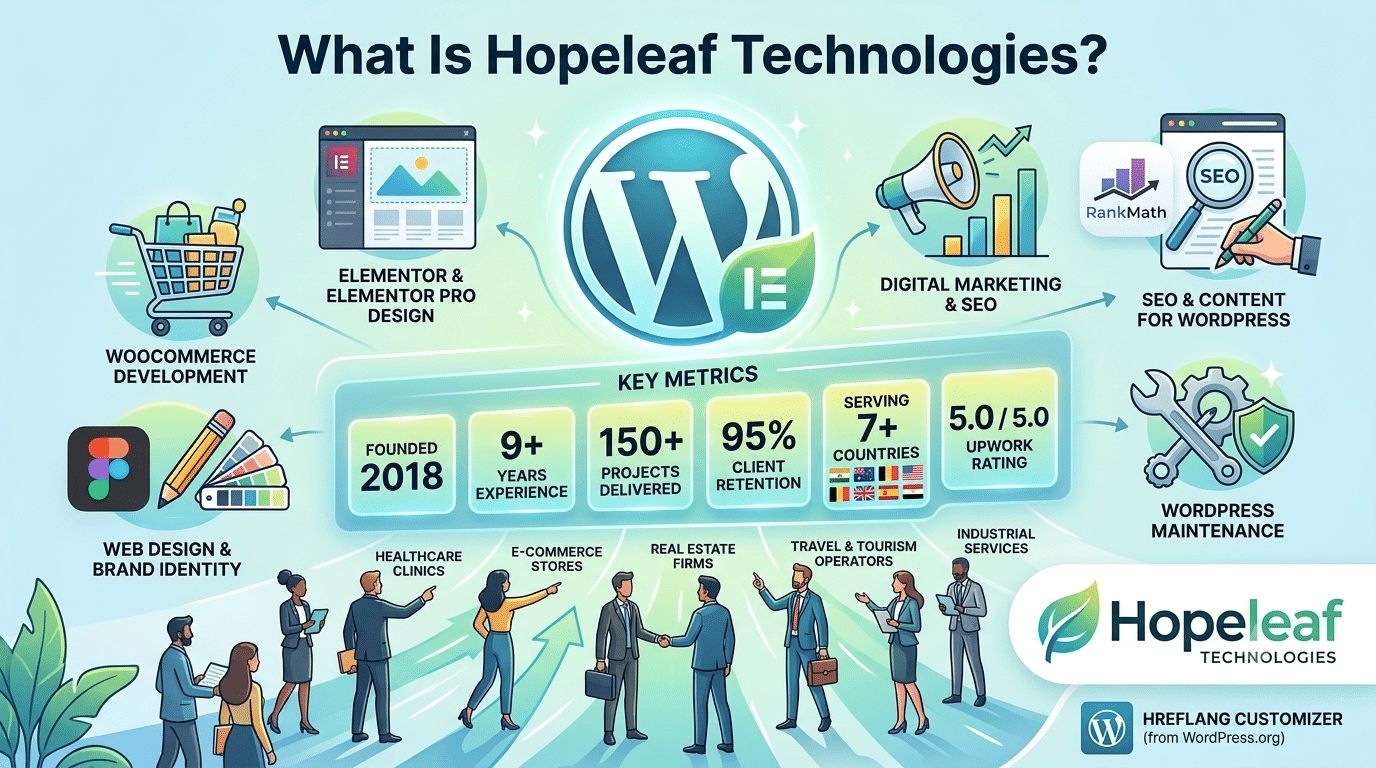
The good news: WordPress Website speed issues are almost always fixable. After nine years of building and optimising WordPress websites at Hopeleaf Technologies, we’ve distilled everything that actually moves the needle into this checklist. Work through it from top to bottom, and your site will be significantly faster.
Step 1 — Choose the Right Hosting
Hosting is the single biggest performance variable on any WordPress Website, and the one most people get wrong. Shared hosting — the cheapest option — puts your site on a server with hundreds of other WordPress website. When any of them spike in traffic, your site slows down.
For a professional WordPress Website in 2026, choose managed WordPress hosting or a VPS (Virtual Private Server). Our recommended hosts for different budgets:
- Budget (₹500–₹1,500/month): SiteGround, Cloudways on DigitalOcean
- Mid-range (₹1,500–₹5,000/month): Kinsta, WP Engine, Rocket.net
- Performance-focused: Any VPS on DigitalOcean or Linode with Cloudflare in front
Step 2 — Install and Configure a Caching Plugin
A caching plugin stores a static version of your WordPress Website pages so the server doesn’t have to rebuild them from scratch for every visitor. This alone can reduce load times by 60–80%.
- WP Rocket ($59/year) — the best all-in-one option. Caching, minification, lazy loading, and database optimisation in one plugin.
- LiteSpeed Cache (free) — excellent if your host uses LiteSpeed web server (SiteGround, Cloudways LiteSpeed)
- W3 Total Cache (free) — powerful but complex to configure correctly
After installing, enable: page caching, browser caching, GZIP compression, CSS/JS minification, and lazy loading for images. Test before and after on GTmetrix to measure the improvement.
Step 3 — Serve All Images in WebP Format
Images are almost always the biggest contributor to page weight. JPEGs and PNGs are far larger than they need to be. WebP — Google’s modern image format — delivers the same visual quality at 25–35% smaller file size.
How to convert to WebP on WordPress Website:
- Install ShortPixel or Imagify — they automatically convert all uploaded images to WebP and serve them to browsers that support it (all modern browsers do)
- Set maximum image dimensions to 1920px wide for hero images, 800px for blog content images
- Target file sizes: hero images under 120KB, blog images under 60KB, thumbnails under 30KB
- Use Elementor’s lazy loading setting (enabled by default in newer versions) to defer off-screen images
Step 4 — Enable Elementor's Performance Experiments
If your site is built in Elementor, these two settings alone can make a significant difference. Go to Elementor > Settings > Experiments and enable:
- Optimized DOM Output — reduces the number of HTML elements Elementor generates, making pages lighter and faster
- Improved Asset Loading — loads Elementor’s CSS and JS files only on pages that actually use Elementor widgets, rather than site-wide
Test your site after enabling both on a staging environment before applying to live — rarely, some custom CSS setups need adjustment after enabling these.
Step 5 — Set Up Cloudflare (Free CDN)
A Content Delivery Network (CDN) stores copies of your static files (images, CSS, JS) on servers around the world and delivers them from the location closest to each visitor. Cloudflare’s free plan is excellent for most WordPress Website.
How to set up: add your domain to Cloudflare, point your domain’s nameservers to Cloudflare’s, then enable Auto Minify (HTML, CSS, JS), Brotli compression, and Browser Cache TTL of 1 year. This alone can reduce TTFB (Time to First Byte) by 30–50% for international visitors.
Step 6 — Reduce Plugin Bloat
Every WordPress Website plugin adds code that runs on every page load. Many sites accumulate plugins over time — some installed for a single purpose and never removed, others doing jobs that could be consolidated.
Audit your plugins: go to Plugins > Installed Plugins and ask for each one — is this actively being used? Does it have a lightweight alternative? Can WP Rocket handle this instead?
Step 7 — Optimise Your Database
Over time, WordPress Website databases accumulate overhead: post revisions, spam comments, orphaned metadata, and transient data. A bloated database slows down every page that requires database queries.
WP Rocket includes a database optimisation tool under Tools > Database. Run it monthly to clean out post revisions (keep the last 3), spam comments, orphaned data, and expired transients. For sites without WP Rocket, the free plugin WP-Optimize does the same job.
Step 8 — Target Core Web Vitals Specifically
Google’s Core Web Vitals are the three performance metrics that directly affect your search rankings in 2026:
| Metric | What It Measures | Target |
|---|---|---|
| LCP | Largest Contentful Paint — hero image load time | Under 2.5 seconds |
| CLS | Cumulative Layout Shift — visual stability | Under 0.1 |
| INP | Interaction to Next Paint — response to clicks | Under 200ms |
LCP fix: ensure your hero image is preloaded. Add fetchpriority=’high’ to your hero image tag, or use WP Rocket’s Preload setting. LCP images should never be lazy-loaded.
CLS fix: always set explicit width and height attributes on images and video embeds. Reserve space for embeds, ads, and late-loading elements so the page doesn’t jump as they load.
INP fix: defer non-critical JavaScript. Use WP Rocket’s Delay JavaScript Execution feature, and exclude only the scripts that are needed for above-the-fold interactivity.
Putting It All Together: Your Speed Checklist
- Host on managed WordPress Website hosting or a VPS — not shared hosting
- Install and configure WP Rocket or LiteSpeed Cache
- Convert all images to WebP format with ShortPixel or Imagify
- Enable Elementor’s Optimized DOM Output and Improved Asset Loading experiments
- Set up Cloudflare free CDN with Brotli compression enabled
- Audit and reduce plugins — remove anything not actively used
- Run monthly database cleanup with WP Rocket or WP-Optimize
- Test on GTmetrix and Google PageSpeed Insights — aim for Grade A and all Core Web Vitals passing
We Build Fast WordPress Website Sites from Day One
Every Hopeleaf Technologies project launches with WP Rocket configured, WebP images, Cloudflare CDN, and Elementor performance experiments enabled. Speed isn't an afterthought for us — it's part of the build.