
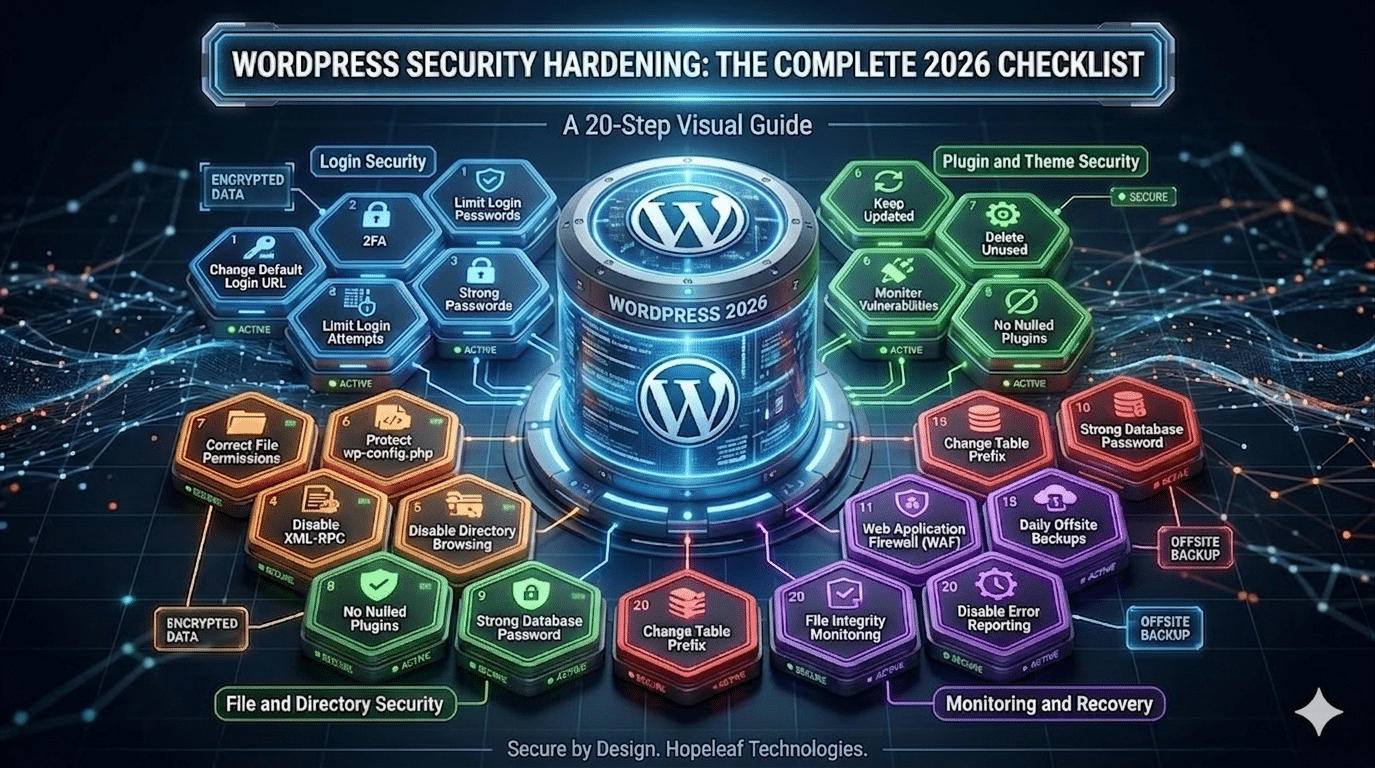
WordPress security hardening is the process of configuring your WordPress Security installation to reduce its attack surface, making it harder for attackers to get in, limiting the damage they can do if they do, and making detection faster when something goes wrong.
Most WordPress security advice focuses on what to do after a hack. This checklist focuses on what to do before, the 20 configurations that, applied correctly, make your site significantly harder to compromise than the vast majority of WordPress Security sites on the internet.
Category 1 — Login Security (4 Steps)
Step 1 — Change the Default Login URL
Every WordPress Security site’s login page is at /wp-login.php or /wp-admin by default. Automated bots scan billions of sites daily specifically targeting these paths. Changing your login URL eliminates the vast majority of automated attacks.
Plugin: WPS Hide Login (free). In settings, set your custom login path, for example /our-team-portal/ or any string that’s not guessable. Update your bookmarks and inform any team members.
Step 2 — Enable Two-Factor Authentication
A strong password is necessary but not sufficient. 2FA means an attacker who obtains your password still can’t log in without access to your phone or authenticator app. Enable 2FA for all administrator accounts, at a minimum.
Plugin: WP 2FA (free) or Wordfence’s built-in 2FA. Use an authenticator app (Google Authenticator, Authy, 1Password) rather than SMS, SMS-based 2FA can be bypassed through SIM swapping.
Step 3 — Limit Login Attempts
Brute force attacks try thousands of password combinations. Limit login attempts, blocking an IP after 5 failures, stops this attack type entirely. Wordfence includes this feature in its free version. Alternatively, the plugin Limit Login Attempts Reloaded (free) handles this specifically.
Configuration: 5 failed attempts before lockout, 30-minute lockout duration, notify admin by email on lockout.
Step 4 — Enforce Strong Passwords for All Users
Use WordPress’s built-in password generator (which produces cryptographically strong passwords) for all admin accounts. Install the Force Strong Passwords plugin to prevent users from setting weak passwords. For client sites, set up a password policy before handing over admin credentials.
Category 2 — File and Directory Security (4 Steps)
Step 5 — Set Correct File Permissions
Incorrect file permissions allow attackers to read sensitive files or write malicious code. The correct WordPress Security permission settings are:
					    WordPress files:       644  (owner read/write, others read)

    WordPress directories: 755  (owner all, others read/execute)

    wp-config.php:         440 or 400  (owner read only, others none)

    .htaccess:             644  (never make executable)

    /wp-content/uploads/: 755  (needed for media uploads, not 777)
Step 6 — Protect wp-config.php
wp-config.php contains your database credentials, security keys, and table prefix. Add this rule to your .htaccess file to block all external HTTP requests to wp-config.php:
					    <Files wp-config.php>

      order allow,deny

      deny from all

    </Files>
Step 7 — Disable XML-RPC
XML-RPC is a legacy WordPress Security API that allows external applications to post content and interact with your site. It’s also used to amplify brute force attacks at a rate of hundreds of password attempts per request. Unless you specifically need it for Jetpack or mobile app posting, disable it.
Add to .htaccess to block all XML-RPC requests:
					<Files xmlrpc.php>

      order allow,deny

      deny from all

    </Files>
Step 8 — Disable Directory Browsing
By default, if someone visits yoursite.com/wp-content/uploads/ and there’s no index.php in that folder, Apache shows a directory listing of all your files. This lets attackers identify your file structure and look for sensitive files. Add to .htaccess:
Options -Indexes
Category 3 — Plugin and Theme Security (4 Steps)
Step 9 — Keep Everything Updated — Immediately
Given the 5-hour exploitation window, ‘update when convenient’ is no longer acceptable for high-severity vulnerabilities. Enable automatic updates for WordPress Security core minor versions (minor security releases). For plugins: use a staging environment to test updates, then apply them to live within 24 hours of a security release being identified.
Tool: MainWP or ManageWP for agencies managing multiple sites, both include automated plugin update monitoring and one-click updates across all sites.
Step 10 — Delete All Unused Plugins and Themes
Every inactive plugin on your WordPress Security site is a potential attack vector; even deactivated plugins have their files on your server and can be targeted. Delete (not just deactivate) every plugin you’re not actively using. WordPress Security ships with default themes (Twenty Twenty-Five, etc.) that you may not be using. Delete all except the one you’re using, plus one backup.
Step 11 — Monitor for Vulnerabilities in Installed Plugins
Set up continuous vulnerability monitoring: install Patchstack (free community tier) and connect your site. You’ll receive email alerts when any of your installed plugins has a new vulnerability disclosed, often before the developer has even released a patch. This gives you time to add a virtual patch rule or temporarily deactivate the vulnerable plugin.
Step 12 — Never Install Nulled (Pirated) Plugins or Themes
This can’t be stated strongly enough: nulled plugins and themes are the single most common method of introducing pre-installed backdoors into WordPress Security sites. They’re the gift that keeps on giving, to attackers. The cost savings aren’t worth the risk under any circumstances.
Category 4 — Database Security (2 Steps)
Step 13 — Change the Default WordPress SecurityTable Prefix
WordPress Security uses wp_ as the default database table prefix. Many SQL injection attacks specifically target wp_users, wp_options, and other standard table names. Changing the prefix to something unique (e.g., hl74x_) makes these attacks less effective.
Do this during WordPress Security installation (edit wp-config.php before running the install wizard). For existing sites, use a plugin like Brozzme DB Prefix & Tools Addons, but back up your database first.
Step 14 — Use a Strong Database Password
Your WordPress Security database password is stored in wp-config.php. Use a randomly generated 20+ character password (available from your hosting control panel when creating a database user). Change it if you’ve ever shared hosting credentials with a third party.
Category 5 — Monitoring and Recovery (6 Steps)
Step 15 — Install a Web Application Firewall (WAF)
A WAF inspects incoming requests before they reach WordPress Security and blocks those matching known attack patterns. Use either Wordfence’s built-in WAF (plugin-level, runs on your server) and/or Cloudflare’s WAF (network-level, blocks traffic before it reaches your server). Network-level (Cloudflare) is more effective but requires DNS changes; plugin-level (Wordfence) is easier to set up.
Step 16 — Set Up Daily Offsite Backups
A daily backup to a location off your server (Google Drive, Dropbox, Amazon S3) is your recovery safety net. If your site is compromised or your server fails, a clean recent backup is the fastest path to recovery. Plugin: UpdraftPlus (free). Configure: Daily backups, retain 30 days, store to Google Drive or Dropbox.
Step 17 — Enable File Integrity Monitoring
Wordfence’s scanner checks all WordPress Security core files, plugin files, and theme files against their known clean versions and alerts you if any have been modified. Enable this and run scans weekly at minimum. An alert about a modified core file is a strong indicator of a breach.
Step 18 — Set Up Uptime Monitoring
Services like UptimeRobot (free), Better Uptime, or StatusCake check your site every minute from multiple global locations and alert you immediately if it goes offline. A sudden site outage can indicate a hack, server compromise, or hosting suspension for malware, you want to know within minutes, not when a client emails you.
Step 19 — Disable WordPress Security Error Reporting in Production
By default, WordPress Security can display PHP errors and notices on the front end of your site. These error messages reveal your file paths, PHP version, database structure, and plugin/theme names, information that attackers can use. Add to wp-config.php:
					 define( 'WP_DEBUG', false );

    define( 'WP_DEBUG_LOG', false );

    define( 'WP_DEBUG_DISPLAY', false );
Step 20 — Use HTTPS and Force SSL Across the Entire Site
All WordPress Security sites in 2026 must run on HTTPS. Install a free Let’s Encrypt SSL certificate via your host (most hosts provide this in cPanel). Install the Really Simple SSL plugin to: force HTTP to HTTPS redirects, fix mixed content issues, and add HTTP security headers (HSTS, X-Frame-Options, X-Content-Type-Options).
- Work through this checklist on a staging site first, then apply changes to production. Some configurations (wp-config.php changes, .htaccess modifications) can break your site if applied incorrectly. Back up before making any server-level changes.
We Implement This Full Security Hardening on Every WordPress Security Site We Build
Hopeleaf Technologies configures all 20 steps above on every client site — from WPS Hide Login and 2FA to UpdraftPlus backups and Cloudflare WAF. Security is built in from day one, not added after launch.
- Get a security-hardened WordPress Security site → hopeleaftechnologies.com/contact-us/
We Build Every Site in Elementor Pro
Hopeleaf Technologies is a specialist Elementor agency — we design in Figma and build in Elementor Pro on WordPress. Fast, editable, and built to rank on Google.